
Inventory control: That is, knowing exactly what products you have on the sales floor and in your stockroom (and how many you have) is the foundation of operating a retail store.
Knowing how much inventory on hand you have is critical for every aspect of inventory management: meeting customer demand, reordering and replenishment, inventory counting and ultimately, your net profits.
When inventory is disorganised, the risk of discrepancies between stock levels in your POS system and what you can actually account for in-store or in your stockroom increases.
Although it’s easy to overlook, systematic inventory classification is vital to retail operations.
Today, we’re going to look at how you can develop and implement a system for organising inventory on your sales floor and storing inventory in your stockroom. With it, you’ll have move accurate and efficient stock counts, fewer preventable discrepancies and more accurate stock replenishment.
In this post, you’ll learn:
- What ABC inventory classification is
- The advantages of ABC classification
- The disadvantages of ABC classification
- Inventory classification best practices
- How to measure inventory accuracy
Let’s get started!
What is ABC inventory classification?
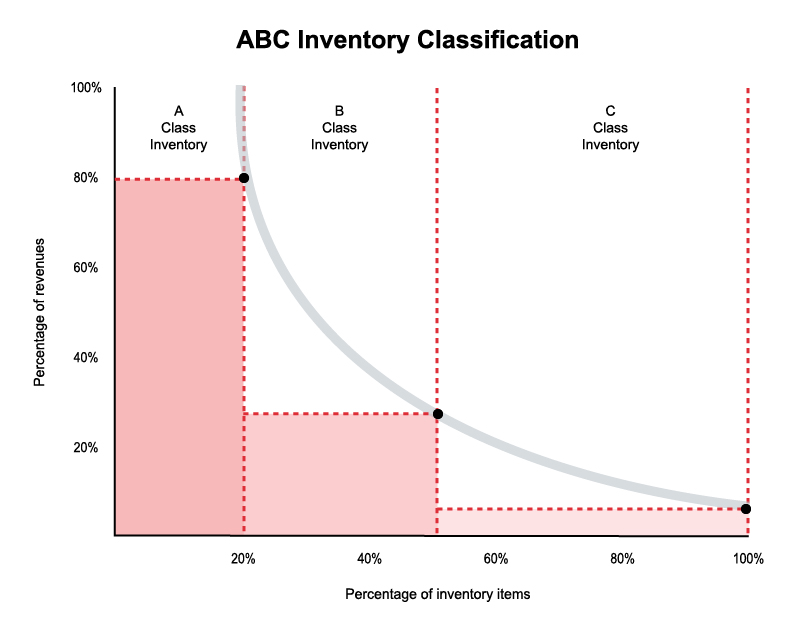
Many retailers categorise their inventory using the ABC classification method, which is based on the Pareto principle, which states that 80% of your results come from 20% of actions. When applied to the context of inventory, it means that 80% of revenues are generated by 20% of your products.
With ABC classification, inventory is classified according to the value of the product unit. For most retailers, the classification structure looks like this:
Group A inventory: The 20% of SKUs that contribute to 80% of revenue.
Group B inventory: The 30% of SKUs that contribute to 15% of revenue.
Group C inventory: The 50% of SKUs that contribute to 5% of revenue.
The advantages of ABC inventory classification
The main benefit of using the ABC classification method is that it leads to more efficient inventory counts and assures that inventory levels of your highest value items are consistently maintained.
Closely monitor the inventory levels of products that belong to group A with routine cycle counts. If you use Lightspeed, set reorder points and desired inventory levels for products belonging to group A. When a particular SKU falls below your set threshold, you know it’s time to submit a purchase order (PO) to your supplier, and you know what quantity you need to order to maintain your desired amount of inventory on hand.
You can apply the same procedure to inventory belonging to group B and C, but with less frequent cycle counts. When combined, both groups account for 80% of your inventory on hand. For most retailers, cycle counting that much inventory on a weekly basis simply isn’t feasible. Just be sure to periodically review inventory levels periodically to maintain as close to 100% inventory accuracy as possible.
The disadvantages of ABC inventory classification
The disadvantages to the ABC classification method are that, while it does give visibility on the total sales value of an item, it doesn’t indicate how many times you turn a particular SKU.
It’s entirely possible that some low-revenue items turn quickly and require more frequent reorders. The revenue they bring your business doesn’t necessarily reflect how popular that item is. Lightspeed users can see which items are your best sellers in terms of units sold in the Grouped Sales Totals report.
Inventory classification best practices
Along with using the ABC classification method for your inventory, it’s important to have an organisational methodology for inventory both on your sales floor and in your stockroom.
When everyone knows where certain products are located, it makes replenishing shelves, counting and selling inventory much easier.
There are two tried-and-true methods for organising a store’s inventory:
- Map out your store and stockroom
- Clearly label stockroom shelves
Categorise your store and stockroom’s layout
The first step to an organised sales floor and stockroom is to create dedicated sections for different product categories.
Create a labeled floor plan for both your sales floor and stockroom that clearly identifies sections by product type. Place a copy in your break room, back office, stockroom and anywhere else where employees congregate. It will be a useful navigational tool for the whole team.
A classic example of a categorised store layout is footwear stores, where there are clearly labeled sections for men’s, women’s and children’s footwear. In each section, the footwear is further categorised by function (lifestyle, running, training, and so on).
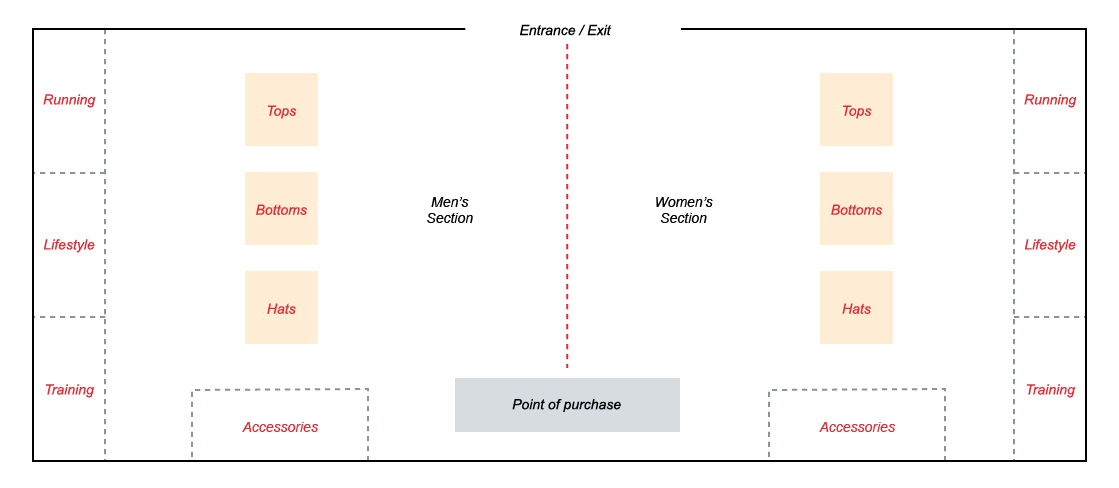
The same goes for the stockroom. Dedicate certain areas to specific product types to make it easier for your staff to find additional sizes, replenish shelves and count inventory when the time comes.
Clearly label stockroom shelves
It’s also a retail best-practice to clearly identify which products are stored on stockroom shelves and to adhere to an organisational methodology.
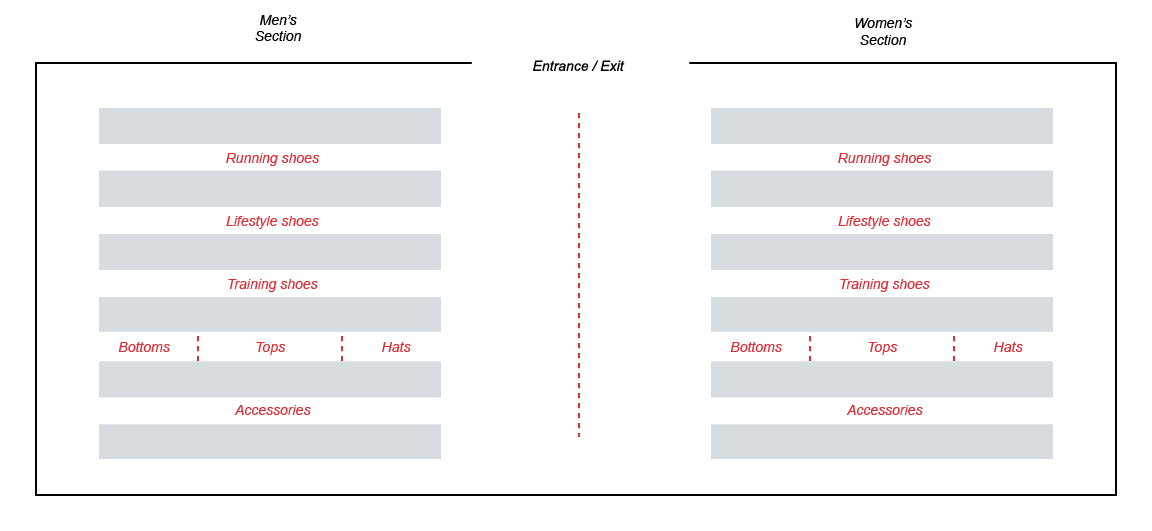
Let’s go back to our footwear store example. In their backstores, men’s, women’s and children’s footwear each have a dedicated section (Tier 1). Within each of those sections, shoes are organised by type (Tier 2). In that section, shoes are classified by the SKU (Tier 3).
Clearly categorise and label your backstore’s sections in the map of your store to assure that each employee adheres to it. If you lay out the plan and everyone follows it, you lower the risk of stock discrepancies due to lost or misplaced products.
Store your products in defined areas and assure that your staff places products in the appropriate section, never placing an item where it shouldn’t be.
How to measure inventory accuracy
The end goal of inventory classification is to have 100% inventory accuracy, meaning that you find no discrepancies to reconcile when you perform inventory counts. But how do you measure what your inventory accuracy is? For starters, you need to count 100% of the inventory you have on hand in a physical inventory count.
Use the floor-to-sheet method during your stock take: First, count the amount of inventory you have on hand per SKU on your sales floor and in your stockroom. Make sure you’ve counted accurately and register your results using a pen and paper or with an Excel spreadsheet (download this free inventory counting spreadsheet if you need a starting point). Next, compare the results of your inventory count to what your POS system thinks you have.
If your count and your POS system’s inventory record don’t match, you have a discrepancy and your inventory isn’t 100% accurate. If your count has fewer counted items than your POS, you’ve lost items to shrinkage. If your count has more items than your POS, its possible that a sales associate accidentally scanned an item twice while processing a payment.
In any case, you’ll need to balance your inventory on hand and the inventory levels registered in your point of sale system. Once you complete a full physical inventory count, you now have a 100% accurate starting point.
Cycle count your Group A inventory regularly to assure you stay as close to 100% accuracy as possible. Remember, that’s the inventory that accounts for 80% of your total revenue.
You should still cycle count group B and C inventory but, since both groups account for a combined 80% of your total SKUs, it’s likely to be a more time-consuming process. With that in mind, cycle count them less frequently than you do group A inventory.
Cycle counting will increase the likelihood of attaining 100% inventory accuracy (that is, no discrepancies) during your next full inventory count. To make full inventory counts less time-intensive, many retailers like to schedule physical inventory counts for the last weekend of January (during the post-holiday lul) or at the end of July because that’s typically when SKU levels are at their lowest.
Classify your inventory to prevent discrepancies
There’s no one way to classify and organise inventory on your sales floor or in your stockroom. Some merchants may prefer to organise SKUs by season, brand, product type, or a number of other characteristics.
What’s important is the underlying problem that inventory classification solves: Having a logical and systematic method for categorising different SKUs and product types helps retailers:
- Routinely track inventory levels of their most profitable SKUs
- Have accurate physical inventory counts
- Maintain ideal inventory levels across all SKUs
- Minimise discrepancies resulting from lost or misplaced items
- Increase employee efficiency
- Maintain an organised sales floor
Consider trying some of the methods we’re outlined here and see which method of inventory classification works best for your retail store.
Good luck!

News you care about. Tips you can use.
Everything your business needs to grow, delivered straight to your inbox.